Position of hands and Method of working
The simplest stitch that is tacking should be
chosen to begin with. Hold the needle between the first finger and thumb, the
thimble should be put on the middle
finger must be placed to the eye of the needle, which is then urged on its
material by all three fingers. The thumb and the first finger are slipped along
to the point of the needle, in order to draw it up and out, the thread
meanwhile slipping between the second and the third fingers, where it is held
firmly.. The needle having now completed an elliptical motion is ready for the
next stitch. Worked in this way the making of a stitch becomes in time a
continuous motion, making for speedy work. The wrist must be slightly bent so
as to bring the line of work almost parallel with the worker’s body.
These positions of right and
left hand will of course have to be modified in the management of certain
pieces of work, but tacking illustrates the most common way of working.
Basting:- There are three
types of basting—even basting, uneven basting and diagonal basting. It is a
temporary stitch.
It is used for
adjusting the length of a dress, draping a skirt, temporarily fastening
together materials that are later to be permanently sewed together.
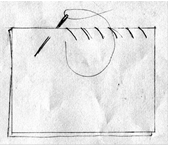
Even basting :-
Even basting is used for marking purposes and for very
particular fastenings, such as important seams. The stitches should be very
carefully taken. Always knot the end of the thread
 Begin at the right-hand end of the work,
passing the needle through the material or materials from the upper side. Take
a stitch underneath the exact length you want all succeeding stitches to be and
bring needle up again through the material. Make even stitches on both side of
the material For all ordinary purposes make your stitch about one-half inch
long.
 Place the needle again through the material
at the same distance from where the thread came through as the stitch
underneath is. Take another stitch the same length as the one previous, and
continue until the whole length of the material is basted.
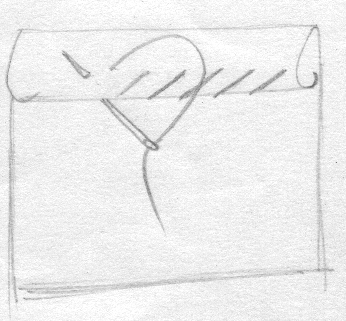
Diagonal basting :- Used to hold the lining to the garment as in coat
or jacket while it is being fitted. Take diagonal stitches on right side and
short vertical stitches on wrong side  Begin at the upper end of the materials to be
basted together. Take a short stitch on underneath side, about one-quarter
inch, from right to left horizontally across the work
  Your needle is now on the right side of the
material. Take a diagonal stitch bringing the needle out directly under the
point where you first brought it to the right side. This diagonal stitch may be
one inch or more long, depending on how easily the material slips out of place.
Back stitching :-
Used where strength is necessary as in seams and bands. Take a short stitch backward on the upper side of the
material and pass needle under twice
that space on the wrong side. Bring needle through to right side and
back to first stitch then repeat process
Hemming:- Used for folding the bottom of skirt, pant etc. Also used for folding the
necklines if blouses and various western garments. These stitches are
put diagonally and minimum upper and lower cloth is caught in the
thread. There are two folds to a hem—a first narrow fold to conceal the raw
edge of the material, and another deeper fold as wide as is desired.  Hold the work to be hemmed in a vertical
position, placing the hem over the forefinger and under the middle finger and
holding it down firmly with the thumb. It is always wiser to baste first,
especially on good material, as this insures a perfectly straight hem.
  Begin at the top, fastening the thread with a
back stitch under the fold.
 Pointing the needle toward the left shoulder,
make a slanting stitch taking up a few threads of the foundation material and a
few threads at the fold of the hem. Draw needle through and repeat.
  Keep your stitches small and even, for the
whole beauty of hemming depends upon fine stitching.
Never knot the end of your thread when you begin a running
stitch as it impairs the appearance of the work and thus indicates poor
workmanship.  Take a small stitch passing the needle over
and under as few threads as possible. The smaller your stitch is the finer the
finished work will be.
 Take several of these stitches on your
needle, making all uniform in size, and then draw the thread through the
material and continue until complete length of the material is covered.
Twisted
running :-This is very simple and quick worked decorative stitch. Work one
or two rows of running, then pass the needle with thread of different color
under each stitch without catching the material.
Combined stitch:-  A stitch that is stronger than the running
stitch and yet one that can be made more quickly than the half-back or
back-stitch is called the combined stitch. To make it, take three or four tiny running
stitches and then a back stitch. Repeat this procedure for the length of the
seam.
Over
Handing
To join folds or selvedges, or to apply bits of lace or
other trimming, where it is necessary to have a flat-finished seam,
over-handing is used. 
 Hold the work lightly between your fingers
with the edge up and draw the needle through both edges.
 Holding the edges even, draw the thread
across the top and take another stitch the same as the first. Be sure you make
your stitches fine and close together,
Over casting
stitches :- This stitch is used to keep the edges of seams or parts of the
garments from fraying. Trim raw edges evenly; then with needle pointing towards
the left shoulder, make slanting stitches.
Top
sewing
This is the simplest way of joining finished edges. In
making the stitch, keep the needle perpendicular to the work by bending the
right wrist. Hold the work in the left hand along the first finger. The
beginning is made secure by leaving a short end on the surface of the work and
sewing it down.. End off by sewing back a few stitches.
This stitch is used to finish flannel seams and hems,
to fasten down linings, and sometimes it is even used for trimming purposes. In making the catch stitch, work from left to
right—the point of the needle is always to the left. Begin at the left end of
the work, taking your first stitch in the foundation.
 Now bring the thread to the right side of the
work, carrying it diagonally across the seam and take a small straight stitch
with the needle pointing left.
  Carry the thread diagonally across the seam
again and continue in this manner with small even stitches, being careful that
they do not show on the right side
Chain stitching :
Insert the needle in the loop made by bringing out the needle downwards
over the thread. In finishing a thread, catch down the last loop formed and in
joining bring the new thread through that loop. Finish ends by running in the
thread on the wrong side
Magic chain stitch:-
This stitch is worked in the same way as chain
stitch, but having two contrasting threads. In the needle at the same time.
When making the loops, pass one color under the needle point and let the other
color lie on top. Pull through both threads , work the next loop with the other
color under the needle point.
Blanket stitching :- Blanket stitching form decorative finish for edges
Working from left to right, insert needle at desired depths. Hold thread under
left thumb and pass needle through with thread underneath needle.
feather stitching :- The method of working is
similar to those of blanket and chain stitch, but the stitches are worked first
on right and then on left of an imaginary vertical line. In finishing a thread
catch down the last stitch formed and in beginning a new thread bring the needle out through
last loop
satin stitch :- Satin stitch consists of rows of
tacking stitch, placed below each other very closely and regularly, so that
when the work is finished it will have a perfectly smooth and satiny surface.
It is one of the simplest and most useful stitches in embroidery
Fish bone stitch:- It looks like satin stitch.
Draw a line in center of design and work
straight stitch closely side by side.
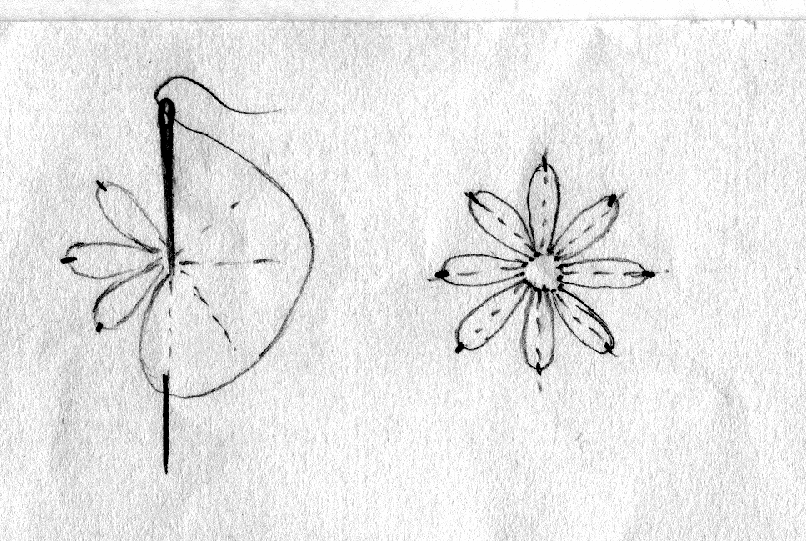
Lazy daisy stitch:- Mark position for stitches. Bring needle up
at center of flower as close as possible to starting point; then make a long
stitch and form loop by passing thread under the point of the needle. Cough the
loop down with a short stitch bringing
the needle back to the center for the next petal.
Buttonhole
stitch:- The buttonhole stitch may be used as an edge as a decorative finish.
Begin buttonhole stitch as follows: Take a several overcastting stitches; then
bring needle down to the desired depth through wrong side, having the thread
behind the eye and under the point of the needle. Draw needle through, forming
the pearl or twist at edge of the material. Do not draw thread tight.
Long and short
stitch:- This is a decorative stitch used to create a shading effect. First mark
the outline of the design with basting stitches. Fill the design using long and
short stitches close to each other.
Herringbone stitch:- Draw the needle upwards at
a point.Take a diagonal stitch and again go down. Then again come up from a
point at same level and a little away.
Now again go down from the point at same level to the first one making a
diagonal stich crossing the first one. Continue the process.
French knot :- First draw needle through to
right side; then wind thread around needle two or three times. Holding thread
firmly around needle, insert through material as close as possible to the place
where it first came up. When last knot is completed fasten on wrong side with
several back stitches.
Bullion knots:- First make a backstitch and then
draw the needle up till the eye and wrap the thread around the point the
desired number of times.Holding the twisted thread pull the needle smoothly
with least disturbance to the twists.Then draw the needle needle downwards
where it is inserted before and pull the thread firmly.
Seedings:- First draw the needle from beneath
the cloth to the upper side. Then again draw it down very close to the first
point , again draw the needle up from the first point and go down very close to
the second point.This gives a thick
effect. The stitch should be as broad as long. Work a series of such
stitches all scattered over the surface in different directions.
Mirror work:- Attach the mirror with the help of
four long stitches.Then insert the needle in fabric making loops around the
long stitches.Fix the entire mirror in the same manner.


No comments:
Post a Comment