Wednesday, 8 January 2014

Seam Finishing

Plain Seam

Plain seam is the simplest of all seams, and the one upon which most others are based.Stitch about ½  inch from the corner  across the entire length of the materials to be joined together.          

open-bound seam.
            Stitch about ½  inch from the corner  across the entire length of the materials to be joined together. Now the seam may be pressed open and both edges bound. This makes a neat, open-bound seam. 

closed bound seam.

Stitch about ½  inch from the corner  across the entire length of the materials to be joined together. Then sew both the edges in the same binding, making it a closed bound seam.
Pinked seam:-  Suitable for velvet, woolen or heavysilk materials. Pink edges by hand, machine or pinking shears; then press seam open.
Seam edges turned in:- Suitable for light-weight silk or cotton materials. Press seam open; then turn under edges obout 1/8  inch and sew with running stitches, or machine stitch close to turned edge.
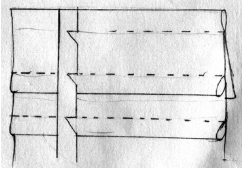
French seam (cover seam):- this is a seam within a seam. Suitable for undergarments, blouses or dresses of silk, chiffon georgette  and other thin or sheer materials. Place the two pieces of material together right side out stitch as near the edge as security will allow. Pare the raw edges clean and sharp. Flatten the seams and turn completely over to the wrong side. Stitch again so as to keep all raw edges out of sight. The French seam is on the inside of the material, and no stitching whatever appears on the right side. French seams are hardly noticeable in fine material.

Flatfell Seam

Stitch the two pieces of material on the wrong side three-eighths of an inch from the edge. Trim off edges of one piece one-eighth of an inch, above the stitching to leaving the other three-eighths. Now make a narrow under turn on the wider edge, and press this wide turned edge flat against the material. It will completely cover the narrow edge.Stitch the turned edge to the material

French Fell Seams

Stitch the two pieces of material on the wrong side three-eighths of an inch from the edge. Trim off edges of one piece one-eighth of an inch, above the stitching to leaving the other three-eighths.After making narrow under turn, bring the edge of the wide portion to the line of stitching, baste and finish with hemming stitch. No stitching shows on the right side.

Rolled Seam

when an exceptionally narrow joining is desired rolled seam is used. Trim the edges of the material evenly.Roll the smallest amount of material possible, rolling each side of the seam separately. When the edges are placed together, these rolls will turn away from each other. . To join, begin at the back of the work and over sew edges closely, making each stitch come under the roll, and not through it.


Tailored Seam

Stitch the two pieces of material on the wrong right side three-eighths of an inch from the edge. Trim off edges of one piece one-eighth of an inch, above the stitching to leaving the other three-eighths. Now make a narrow under turn on the wider edge, and press this wide turned edge flat against the material on the right side. It will completely cover the narrow edge.Stitch the turned edge to the material.

Flannel Seams

Stitch the two pieces of material on the wrong side three-eighths of an inch from the edge. Trim off edges of one piece one-eighth of an inch, above the stitching to leaving the other three-eighths. Now make a narrow under turn on the wider edge, and press this wide turned edge flat against the material. It will completely cover the narrow edge.Do catch stitching to hold the seam flat against the material.


Advance seam finishing

Gathering :-
Gathering is used for disposing of fullness in the garment. On the side of the cloth to be gathered put running stitches or long machine stitches. Remember to take a strong thread. Then by pulling the thread  slowly gather the excess cloth  as required.

Shirring: It is a  type of gathering in which several rows of running stitches, the desired distance apart are drawn into required amount. The stitch do not have to lie under each other
Whipping :_Used where fine edge is required in sheer material as for handkerchiefs etc. Roll edge as you make stitches from right to left. Pass the needle under the rolled edge, not through it.
Smocking:-         It is a very decorative way of reducing the fullness of garment when it is abundant. It is almost same as gathering made by using cross stitches. Three times more cloth is required for this stitch.
Dart:-

Mark the dart as shown in the figure on the wrong side. Fold the dart on the center line. Stitch the dart on wrong side . For heavy materials slash dart after seam is joined, press open and overcast edge.

Side pleats :- Pleat lines may be marked with tailors tacks, tailor chalk or tracing wheel..Side pleats run in one direction .From pleats  by bringing corresponding lines together ; then baste to hold in position and press


Inverted pleat:-  The inverted pleat is made by bringing 2 folded edges together, which form a box on wrong side
Box pleats :- It consists of 2 pleats turned on opposite direction to  form a box pleat effect.After pleat lines are marked ,form box pleats  and baste to hold in position; then press.
Stitched pleats:- Form pleats and stitch close to folded edges.
Plain tucking:- Make a cardboard gage, cutting in the notch to show the width of the tuck and width of space between tucks. To make tuck , fold material, right sideout, using the gage  as the guide ; then make tuck with a fine running stitch.


Scalloped tucking :-  Used as decorative tucking. Make the tuck as described above, but  at even intervals, take 2 stitches  over the tucks , drawing stitches close to form scallop


Cross Tucking :- Used as trimming in blouses , lingerie or children garments. Cross tucking should be done before cutting out the garment.

Make all tucks running  in one direction and press to one side ,before making the cross tucks

Corded tucking :- Mark position for tuck; then place material over cord , right side out , and sew with a fine running stitch close to cord. This can also be stitches by machine with a cording attachment.


Couching a cord:-  Place  cord position on the material. Then working from right to left, catch cord down firmly by bringing the thread over the cord, and through the material at regular intervals
Buttonhole :- mark position for buttonhole and reinforce with several rows of machine stitching before slashing

Beginning at innerend, work buttonhole stitch down buttonhole stitch down one side, continue around outer end and along the other side

At the inner end , make several stitches across slash, forming  a bar tack. Make blanket stitch over bar tack and through the material
Button
Sewing button :- Using  a heavy thread or twist, make a knot at the end of a double thread.then with a pin over the center of button, sew back and forth across pin. The pin keeps the thread loose enough to form a stem.
Remove pin and wind thread firmly around stem; then draw needle to wrong  side and fasten  with several stitches
Snap fastners :- Sew snap fastners to the corresponding position , making over and over stitches in each hole

Sewing on Hooks and Eyes:- Sew these on by means of buttonhole or blanket stitches, filling each hole or ring with stitches. Place the stitches closely , but not one on top of other.On passing from one hole to another, slip the needle between the folds of the cloth.Buttonhole stitch up the shank of the hook. In sewing on an eye make several stitches round the eye just above the ring. Place the flatter portion of the fastner on the upper side of article which require washing and ironing

Eyelets :- Out line eyelet with small running stitches;then punch center with stiletto. Make padding stitches ; then finish edge with close, over and over stitches. Buttonhole stitches may also be used.If the stiletto is inserted every three or four stitches it will help to keep the edge rolled as you stitch.

What is a Facing?
Very often you will find that you haven’t sufficient length of material to make a hem on your skirt or to turn up the sleeves at the cuff. Or you may find that it is not practical to finish the edge of a waist or skirt with a hem. When this happens, it will be necessary to use a facing of other material—and this can be accomplished in a number of different ways. Only remember this one important thing: When you are working on fine, sheer material never use a facing if you can use a hem, for the joining seam of the facing would show through and make that part of the garment look clumsy and unsightly.
There are three kinds of facings—bias, fitted and exceptional. When applying facings always be sure that the edge to be faced is carefully trimmed and that a straight facing is used for straight edges and a bias facing for curved edges. If the edge to be faced is the bottom of the skirt mark the proper length before trimming.

Bias Underfacing:-  Used to finish a rawedge, as in a neck edge, sleevless armhole etc.
Cut a bias strip about 1 ¼  inchwide and sew one edge of garment,right side together. Make slashes in curved edges so that material will not draw.Turn strip to inside so that seam will not show  on right side of garment; then turn under other edge of strip and sew on strip only, hem to garment occassionaly

Shaped interfacing:-the shaped interfacing is usually made wider than the narrow bias underfacing, and is cut on the same grain of goods as the garment. Cut an interfacing according to the shape of the edge to be interfaced. Sew underfacing  to the edge of the garment  right sides together. Clip seam allowance at corner and around curved edges. Turn underfacing to inside and then turn under other edge of strip and sew on strip only, hem to garment occassionaly

Finishing slashed opening with binding:-

Cut a bias or a straight strip about 1 ½ inch wide and ½  inch longer than the opening.Baste the strip right side together. Stitch 1/8  inch around basting line. Slash through center and diagonally to each corner. Turn strip to wrong side. When turning strip to wrong side, form an even binding on right side and press. Turn under edges of binding and hem to position.

Finishing slashed opening with facing:- Baste center of facing , right side together. Stitch along seam allowance at neck edge and around each side of basting line, reducing width of seam allowance from 3/8  inch at top to less than 1/8  inch at bottom. Mark slashes at curved part of neck edge not too close to stitching ; then slash down center for opening. Turn facing to wrong side and press. Turn under edges of facing and hem to position.
Pipings

To make a perfect piping, the material must be on a true bias otherwise it will not lay flat. To make a perfect bias edge, fold a straight crosswise and lengthwise line together, and cut on the fold. Keep this line perfect at each cutting. Do not cut very short lengths of piping, as this brings the seams too close together, and as the piping is applied as a trimming it should contain as few seams as possible. You realize, of course, that an unsightly piping can add nothing to the appearance of the dress or blouse you are making.

Quilting


  1. Baste the thicknesses of material to be quilted together.
  2. Determine just what pattern you are going to use. The cris-cross pattern is the most frequently used.
  3. Mark the pattern on the material to be quilted, either with colored basting thread or tailor’s chalk.
  4. Follow this line with fine running stitches, taking the stitches through all the material that is to be held together by the quilting


Bias Strips:- For a true bias binding , fold material so that the crosswise thread meets the lengthwise thread or slevedge.  Mark and cut strip the desired  width . If required join bias strips crosswise to crosswise edge.
Bias Binding ( single ) :-
Used to trim and finish raw edge. Cut bias strip twice the width of the finished binding, plus seam allowance on each edge. Cut seam allowance away on edge to be bound. Sew one edge of the binding to edge of garment, right sides together; then roll binding to inside, turn under seam allowance and hem to position.
Bias binding ( double ) :-  Used mainly for sheer or thin materials. Cut bias strip 4 times the width of finished binding, plus seam allowance on each edge. Fold strip through center and press. Sew raw edges of binding to edge of garment, right sides together; then roll binding to inside and hem folded edge to position.